Choosing a power rack is not just a matter of comparing steel gauges or counting attachment points. In a busy gym, the right setup must fit the room, support varied training, and keep daily adjustments straightforward. Custom commercial power racks can be built around those needs, but “custom” does not automatically mean better. Poorly planned dimensions or accessories can waste floor space and complicate use.
For this guide, fictional composite equipment specialist Jordan Hale offers a practical design principle: “A rack earns its place when it fits the lifters, the room, and the work.” This is an editorially created quotation, not a sourced interview. The seven options below are assessed through practical criteria: frame dimensions, load capacity, adjustment range, attachment compatibility, finish, and the clarity of manufacturer specifications. Those details matter when a rack must handle repeated sessions, changing users, and limited room around benches or dumbbell stations.
Small details count. A pull-up bar that sits too low can frustrate taller athletes. A pin that catches during a busy session becomes more than a minor annoyance. Still, no single model suits every gym. Installation, maintenance, user experience, and budget deserve a closer look, and product specifications should be checked with the manufacturer before purchase. Some comparisons may seem less decisive than expected. That is worth acknowledging: the best choice depends on how the rack will actually be used.
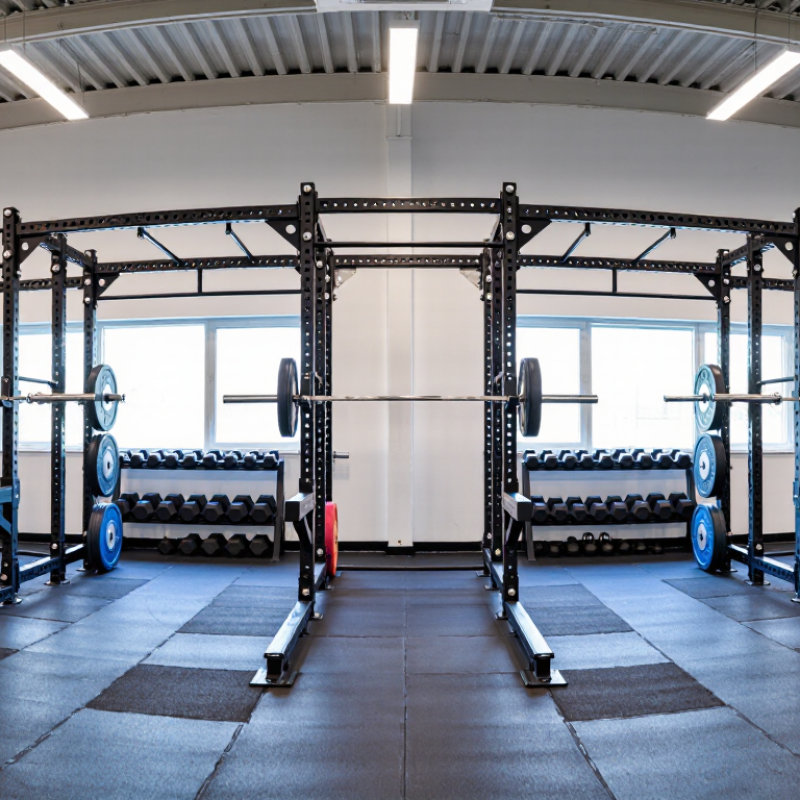
A custom commercial power rack is designed around how a gym actually operates, not just how it looks on a floor plan. Its height, width, and depth should fit the available space while leaving clear paths for members and staff. For example, a rack placed beneath a low ceiling may need a shorter pull-up bar. Hole spacing matters too: closer adjustments can help users set safeties at useful heights for different lifts. Small details count.
Commercial use also calls for durable steel, stable feet, and secure connections between uprights and crossmembers. The frame should remain steady during repeated loading, while spotter arms or safety bars must lock firmly into place. A rack may also need storage pegs, band posts, or multiple training stations, depending on the gym’s traffic. These features should support normal training, not crowd the lifting area. More options are not always better.
Before specifying a rack, consider who will use it, how often, and which exercises are most common. Ask about installation, floor anchoring, maintenance, and replacement parts. These questions are easy to overlook. A custom design can still miss the mark if measurements are rushed or users’ feedback is ignored. Even experienced operators may revise a layout after seeing how members move around it.
When comparing custom commercial power racks, start with the gym floor, not the catalog. Measure ceiling height, aisle width, and the space needed for benches or spotter arms. A rack that fits on paper may crowd a busy training area. That matters.
Check the frame’s steel dimensions, finish, and stated load rating. Ask how the rating was tested and whether it applies to the complete rack or individual parts. Inspect welds and hole spacing, too. Even, clearly marked holes make adjustments easier when several lifters share one station. Numbers alone are not enough.
Safety and fit should guide the custom options. Confirm that the rack accepts compatible safeties, pull-up bars, and storage attachments without awkward gaps. If the unit needs floor anchoring, verify the required surface and installation method before ordering. Leave room for staff to inspect bolts and clean around the base. Those small tasks are often overlooked.
Finally, compare warranty terms, replacement-part availability, and delivery support. Ask for drawings showing dimensions and attachment positions, then check them against the actual room. A minor mismatch can disrupt daily use. It is easy to focus on capacity and forget service access; I would not treat that as a small detail.
Commercial gyms rarely need identical racks. In my equipment planning, I match each frame to traffic, ceiling height, and coaching style. Option one is a compact wall-mounted rack for narrow studios. Option two is a four-post rack with storage horns for busy strength rooms. Option three adds adjustable cable columns for mixed training. Option four uses extra-tall uprights for athletes practicing overhead lifts. Each choice needs measured floor clearance. A few centimeters can change safety and walking flow. I once underestimated plate storage, and the platform became crowded. That mistake still influences my layouts.
Option five is a half rack with spotter arms, useful for supervised group sessions. Option six is a connected multi-station rig for schools and large facilities. Option seven is a modular rack with removable pull-up bars and expandable bays. It suits gyms expecting membership growth. Specify steel thickness, anchor points, weld quality, and finish durability. Ask for load testing data, installation drawings, and replacement-part support. Custom does not mean unlimited. A complicated design may slow maintenance and confuse new users. I prefer clear adjustments, visible safety pins, and enough space for a loaded bar.
Tips: Measure the full lifting zone, not only the rack footprint. Leave walking space behind every station. Test adjustment points with gloved hands. Review the layout with coaches before ordering. Their practical feedback often reveals problems on paper.
7 Best Custom Commercial Power Racks for Gyms
Customization starts with the gym’s floor plan, not the rack catalog. Measure ceiling height, walking lanes, flooring depth, and emergency access before choosing a frame. A modular rack can support several stations, but poor spacing creates congestion during busy sessions. Seven strong configurations may include wall-mounted, half, full, dual-sided, corner, bridge, and multi-bay systems. Each option should match actual training demand.
Attachments should serve clear training goals. Adjustable j-cups, safety arms, pull-up bars, dip handles, cable systems, and storage pegs improve versatility. However, adding every attachment can make the rack expensive and difficult to supervise. Steel thickness, weld quality, hardware fit, and rated load capacity deserve careful review. In practice, small compatibility problems can interrupt a class. I have seen layouts look efficient on paper but feel cramped once benches and plates are in place.
Tips: Mark the rack footprint with floor tape before installation. Test bar paths with a loaded training bar. Keep storage within easy reach, but outside lifting zones. Ask coaches which attachments they actually use. Review the layout after two weeks of real training; the first plan may be wrong.
A custom commercial power rack is only as reliable as its installation. When comparing seven strong options, measure ceiling clearance, floor capacity, anchor points, and equipment spacing. A qualified installer should verify the structural substrate, not simply tighten bolts. Concrete anchors need the correct diameter, embedment depth, and torque. Record every value. Leave room for adjustable safeties and spotting arms. This detail is often ignored. It should not be.
Safety inspection should begin before the first loaded bar. Check welds, uprights, J-cups, pins, cables, and protective feet for movement or damage. Test every adjustment under controlled, unloaded conditions. Then use progressive loads while another trained person observes. Keep clear instructions beside the rack, including load ratings and approved attachments. Local building and workplace requirements may affect anchoring, access, and inspection frequency. A professional review is wise for raised, cracked, or flexible flooring.
Long-term maintenance works best as a scheduled habit. Clean chalk and sweat from contact points, then inspect fasteners weekly in busy facilities. Re-torque connections according to the installer’s instructions, rather than guessing. Replace bent pins, split padding, or damaged hardware immediately. Keep a dated log with photographs and repair records. In practice, maintenance logs are sometimes incomplete. That weakness deserves attention. Staff turnover can erase useful knowledge, so train more than one person and review the checklist monthly. A rack may look solid while a hidden anchor loosens.
| 7 Best Custom Commercial Power Racks for Gyms? - Installation, Safety, and Long-Term Maintenance Considerations | ||||||
|---|---|---|---|---|---|---|
| Rack Configuration | Typical Planning Dimensions | Best Suited For | Installation Considerations | Safety Priorities | Long-Term Maintenance | Key Customization Choices |
| Four-post full power rack | Commonly planned at about 48–60 in wide, 24–48 in deep, and 84–96 in high; confirm the usable interior dimensions for the selected design. | General strength areas needing a self-contained station for squats, bench presses, and pull-ups. | Check ceiling clearance for the rack and overhead movements. Confirm floor flatness, delivery access, assembly space, and whether the design requires floor anchoring. | Use correctly rated safeties and matching attachments. Keep the rack stable, and follow the documented load limits for the exact configuration. | Inspect bolts, uprights, safeties, J-cups, and welds regularly. Replace worn protective liners and address corrosion or damaged finishes promptly. | Rack depth, upright height, hole spacing, pull-up bar, safety style, and storage pegs. |
| Six-post rack with integrated plate storage | Often requires roughly 72–96 in of depth, depending on the lifting bay and storage section; width and height vary with the selected frame. | Busy strength floors that need a dedicated lifting bay and organized plate storage in one footprint. | Plan for the longer footprint and the added weight of stored plates. Verify the floor and anchoring requirements for the complete loaded assembly. | Keep storage pegs within their stated capacity and distribute plates as instructed. Keep the lifting area and exit routes clear. | Check storage pegs, fasteners, and frame connections for movement or wear. Keep plate sleeves and contact surfaces clean. | Storage-section position, peg quantity, bay depth, attachment locations, and accessory storage. |
| Half rack with spotter arms | Typically needs less depth than a full rack; allow sufficient clear space in front and behind for bar loading and movement. | Gyms seeking open access and a smaller footprint for squats, presses, and general barbell training. | Confirm whether anchoring is required by the rack design. Consider the effects of uneven loading, plate storage, and repeated bar contact on stability. | Set spotter arms at an appropriate height before lifting and verify that both arms are fully engaged. Do not exceed the stated rack or attachment limits. | Inspect arm pins, connection points, J-cups, and anchor hardware. Replace damaged protective surfaces to reduce metal-on-metal contact. | Spotter-arm length, pull-up bar, storage pegs, upright height, and accessory compatibility. |
| Wall-mounted fold-back rack | Projects into the room when open and folds nearer to the wall when stored; required projection depends on rack depth and the folding design. | Small training rooms or multipurpose spaces where floor area must be reclaimed between sessions. | Requires a suitable structural fixing surface and installation hardware specified for that wall type. Have the wall structure and fixing method verified by a qualified installer. | Confirm that the rack is fully opened and secured before use. Follow the manufacturer’s instructions for anchoring, loading, and folding. | Check wall fixings, hinges, locking pins, and moving joints for looseness or wear. Stop use if the mount shifts or develops visible damage. | Folding direction, projection depth, pull-up bar, storage solution, and mounting layout. |
| Open four-post rack with rear storage | Planning dimensions vary with the lifting bay and storage arrangement; reserve clear space around the user and loaded bar. | Facilities that prefer quick access to the bar and attachments without enclosing the lifting area. | Plan the position of plate pegs and accessories so they do not obstruct walkways or the lifter’s movement. Confirm anchoring requirements. | Use compatible safeties for the chosen frame. Keep stored plates secure and avoid placing accessories where they can create trip or impact hazards. | Check attachment pins and storage hardware for wear. Inspect high-contact areas and keep the floor around the rack clear. | Storage location, safety system, pull-up bar, band pegs, and attachment layout. |
| Multi-bay rack system | Overall length depends on the number and width of bays; allow additional space for bar loading, user access, and circulation. | High-throughput gyms that need several users to train at adjacent stations. | Plan the complete layout before installation, including spacing between bays, floor anchoring, delivery access, and clear routes through the training area. | Specify compatible safeties and attachments for every bay. Clearly manage shared use, and keep users clear of neighboring bars and lifting paths. | Inspect shared crossmembers, anchors, and connections across the full assembly. Record inspections and address loose components before returning the system to use. | Number of bays, bay spacing, shared or independent uprights, storage, and accessory positions. |
| Rack with integrated cable attachment | Requires space for the rack plus the cable station’s movement and user access; dimensions depend on the pulley layout and weight-stack design. | Facilities wanting barbell training and cable exercises in a combined station. | Check total floor area, ceiling height, equipment delivery route, and any separate anchoring or assembly needs for the cable section. | Use only the specified cables, pulleys, weight stack, and attachments. Inspect cables for fraying and keep hands clear of moving weight-stack components. | Follow the equipment schedule for cable, pulley, guide-rod, and fastener inspections. Replace damaged cables and worn components before use. | Single or dual pulley, cable travel, handle storage, weight-stack arrangement, and rack attachment options. |
| Planning note: Dimensions above are general layout ranges, not specifications for a particular product. Actual dimensions, rated capacities, anchoring methods, and compatible attachments vary by design. Verify the selected rack’s documentation, building conditions, floor requirements, and applicable local safety rules before purchase or installation. | ||||||
It should match the gym’s space, traffic, and common exercises. Durable steel, stable feet, and secure connections matter. More features are not always better.
Measure ceiling height, aisle width, lifting space, and bench clearance. Include walking paths around every station. A few centimeters can change movement flow.
Low ceilings may require shorter uprights or a lower pull-up bar. Extra-tall frames suit overhead training only when enough clearance exists. Check the ceiling carefully.
Safety bars and spotter arms should lock firmly at useful heights. Evenly spaced holes make adjustments easier for different lifters. Test the adjustment points with gloved hands.
Check steel dimensions, weld quality, finish durability, and connection strength. Ask how the load rating was tested. Numbers alone are not enough.
Storage pegs, band posts, cable columns, and extra training stations may help. They should not crowd the lifting area. Storage can quietly become a problem.
A compact wall-mounted frame may suit a narrow studio. A half rack can support supervised group sessions. Modular bays may help facilities expecting growth.
Request dimension drawings, attachment positions, anchoring details, and installation requirements. Check replacement-part support and service access. I once underestimated plate storage, and the platform became crowded.
Review the layout with coaches before ordering. Their feedback may reveal awkward walking paths or confusing adjustments. Paper plans can miss real behavior.
Custom commercial power racks are designed to meet the demands of busy gyms, combining sturdy construction, dependable safety features, and flexibility for different training styles. Choosing the right rack involves comparing factors such as footprint, weight capacity, adjustability, finish, and compatibility with gym equipment. The seven options discussed represent varied needs, from facilities seeking a compact setup to those building a versatile training area for multiple users.
Customization can help a rack fit a gym’s layout and support its programming through choices in dimensions, attachments, and training configurations. Before installation, consider available floor space, anchoring requirements, and safe clearance around the equipment. Regular inspections, cleaning, and timely replacement of worn components can help preserve performance over time. By weighing these practical considerations, gym owners can select Custom commercial power racks that suit their space, users, and long-term training goals.